Saturday, October 26, 2013

Transforming An Old Metal Trunk

An old metal trunk can be very handy. They serve a duel purpose, being  both decorative and  wonderful for added storage . In bedrooms ,family rooms or hallways you can always find a use for them.

For this trunk I started with ASCP in Old White, then started adding a cute graphic...


I love working with paint pens.you can find them in water base or oil...I use both.

 now it's time to sand..i use a 220 sandpaper
after sanding it's time to age the piece..i use a clear wax to set the piece first, then to age it i use dark wax, dust of ages and gilders paste in black..

The end result is a lovely trunk ready to grace any room in your home...

Tuesday, October 22, 2013

From Trash To Family Heirloom

This piece has been a challenge ..but in the end it was worth it..starting out in one direction and ending with something breathtaking..

It all started with bleed through..which changed everything...after taking the piece down to bare wood and removing some things that had been added over the years I fell in love with what was underneath..

so I decided to keep it light..

I stained the top "summer Oak"

painted the base old white.. added  2 graphics...a French letter..and a lovely crown..

distressed ,waxed and aged her.. gave her a little extra bling with new knobs.. and I must say I am in love...she will be at the Lucketts holiday market on Nov. 8-10...

Friday, October 18, 2013

The Dreaded Bleed Through

Each piece I work on is different..I never know how it will turn out..So many things can affect the outcome...none more bothersome than Bleed through..you prep the piece, and put on a few coats of paint and after awhile this ugly stain comes peeking through...at that point I have to decide...do I work with it, or change direction..
 for this piece I decided to change direction..so I took it down to the bare wood...

 stained the top..and  i'm going with old white..i think this is the direction she wanted to go in all along...

The Making Of The Haunted Manor

Simple enough, it all started with a poem.

I wanted something different..it had to be special

So I allowed my artistic abilities to run wild

It was going to be over the top..

every detail..


real lights sit atop the columns


each brick was hand carved...and hand painted..

Halloween at our house is a huge production and I would not have it any other way..I've been told the Manor has become a destination on Halloween night,Families out together..grandparents taking pictures...how wonderful..

Wednesday, October 16, 2013

A Holiday Banner

I love making holiday banners, so I thought I would share how I make them..Supplies..Ruler, scissors, grommet kit,card stock,pencil,craft fuse iron on backing,fabric( for this project I use a drop cloth as my fabric). iron, hot glue gun, glue sticks, liquid stitch,glitter glue,glitter,ribbon

I make a pattern from a piece of 8.5 x 11 card stock. the middle of the card stock is 4.25..make a little mark

 from that mark use the ruler to draw a line to the bottom corner,

do the same for the other side. then follow the line and make your cut.

take a piece of fabric(a little larger than 8.5 x 11) and  iron on a piece of craft fuse.( follow directions on the back of the package).after  you have applied the craft fuse place your pattern on the fabric and trace your pattern.

 cut out the fabric..

I am making several different banners for several holidays.. but for the Halloween banner I need 3 pieces to spell out the word Boo..I decide what I want on the banner and start drawing ..you can use stencils if you do not want to try it free hand..
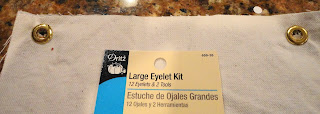
after I have my design  completed, I add my grommets..

for this banner I am going to use glitter for the letters.. so I apply glitter glue to my design and sprinkle on the glitter..

not bad..this will need to dry for a few hours..

after the glitter has dried it's time to decorate the banner..i love using scrap pieces of ribbon and trims..( I save everything, no matter how small)
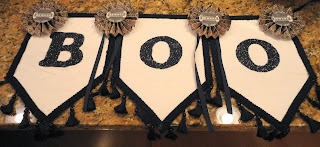
and here is my finished piece..i love it..
Monday, October 14, 2013

making a 6 inch medallion

Supplies-cardstock,scissors,hot glue gun,glue sticks,ruler,pencil, something to trace for small circle..i find K-cups work great for a 6 inch medallion..I start with an 8.5 x 11 piece of cardstock

with the cardstock face down and using the 11 inch width,i use my ruler to mark 3 3inch strips..

I use my cricut cutter to make the cuts

I now have 3 strips of cardstock at 3x 8.5

at the 3 inch end of the strips I mark each about a 1/2 up from the bottom.. this mark is your guide for your pleat..

using your 1/2 inch mark start folding the strips accordion style

you should now have 3 accordians

start gluing the ends together

you should end up with a circle


gather the circle together til you get a cone shape and lightly press down.

you now have a paper medallion

I use a k cup to trace 2 circles on the scrap paper

I glue a circle on the top and bottom on the medallion

and this is the end result...Happy Crafting...